
Automate Your Design System Documentation with Custom Figma MCP + Docker
A practical guide for designers, and others.


Have you ever spent an entire afternoon copying design tokens from Figma into your documentation? Manually transcribing component properties? Triple-checking that spacing values match between design and code?
I’ve been there. And I can tell you from 10+ years managing design systems: manual documentation is the silent killer of design system velocity.
Here’s what kills me—most design teams in 2025 still document components manually. According to the 2025 Design Systems Report, over 50% of design systems teams have minimal or no automation. That means designers are spending 45-60 minutes documenting a single component when they could be spending 5 minutes.
The gap between what’s possible and what most teams actually do is massive.
But here’s the good news: you can change that today. With a custom Figma MCP (Model Context Protocol) server and Docker, you can automate design system documentation and get 6-100x faster at the tedious stuff. That means extracting design tokens, documenting components, and keeping everything in sync becomes almost effortless.
This isn’t about replacing designers. It’s about giving you superpowers to focus on strategy and craft instead of copy-paste drudgery.
What You’re Going to Build (and Why It Matters)

Let me be straight with you: this setup requires some technical work upfront. But once it’s running, it transforms how you maintain design systems.
What you’ll create:
A custom Figma MCP server that connects directly to your Figma files via API
Docker-based infrastructure that Claude Desktop can use to automate documentation
A workflow that turns 45 minutes of manual work into 5 minutes of automated extraction
What you’ll be able to do:
Extract all design tokens from Figma with their values for light and dark modes
Document components automatically with all properties, variants, and bound tokens
Audit your entire design system for consistency in minutes instead of days
Generate always-current documentation that syncs with your Figma source of truth
Time savings by task:
Document 1 component: 45 min → 5 min (9x faster)
Extract all tokens: 60 min → 2 min (30x faster)
Audit 50 components: 2-3 days → 15 min (100x+ faster)
Update docs after design change: 30 min → 3 min (10x faster)
This is exactly the kind of automation that helps teams pay down design debt in large products without grinding to a halt. When documentation stays current automatically, design systems actually scale.
How This Fits into Modern Design Workflows

You might be wondering: “Why custom when Figma has official MCP?”
Great question. Figma’s official MCP server (launched June 2025) is fantastic for design-to-code workflows. It’s built for generating React components and translating designs into functional code.
But if you’re managing a design system, you need something different:
Token extraction at scale - Pull hundreds of design tokens with all their mode values
Component property analysis - Understand every variant combination and what tokens they use
Documentation automation - Generate comprehensive docs, not just code
Custom workflows - Build exactly what your team needs
The custom approach gives you that flexibility. And with Docker MCP Toolkit Gateway, you can run multiple custom servers alongside official ones—like having specialized AI tools transforming design workflows working together.
Prerequisites (What You’ll Need)
Before we dive in, make sure you have:
✅ Docker Desktop installed and running (download here)
✅ Claude Desktop installed on your computer
✅ Figma Personal Access Token (we’ll get this in Step 1)
✅ Basic terminal/command prompt access (don’t worry, I’ll walk you through every command)
✅ 30-45 minutes for initial setup (one-time investment)
If you’ve never used terminal or Docker before, that’s okay. I’ll explain each step clearly. The setup is straightforward once you see the pattern.
Step 1: Get Your Figma Access Token
First, you need to tell Figma that your custom server should have access to your files. You do this with a Personal Access Token—think of it like a special password just for this connection.
Here’s how to get it:
Open your web browser and go to Figma.com
Log into your Figma account
Click your profile picture (top-left corner)
Click Settings in the dropdown
Scroll down to Personal Access Tokens section
Click Generate new token
Name it something clear like:
Design System MCP ServerClick Generate token
IMMEDIATELY COPY THE TOKEN - Figma only shows it once!
Paste it into a text file and save it somewhere safe
Important security note: This token gives access to your Figma files. Don’t share it publicly, commit it to Git, or post it in Slack. Treat it like a password.
Step 2: Create Your Custom Figma MCP Server
Now we’ll build the actual server that talks to Figma’s API. We’re using Docker because it keeps everything contained and easy to manage.
Step 2.1: Open Your Terminal
For macOS:
Press Cmd + Space (opens Spotlight)
Type
terminalPress Enter
For Windows:
Press Windows Key + R
Type
cmdPress Enter
For Linux:
Press Ctrl + Alt + T
Step 2.2: Create the Project Directory
Type these commands one at a time (press Enter after each):
cd ~
mkdir figma-mcp
cd figma-mcp
What this does: Creates a folder called figma-mcp in your home directory and navigates into it. This is where all our server files will live.
Step 2.3: Create the Dockerfile
The Dockerfile tells Docker how to build your server.
For macOS/Linux:
nano DockerfileFor Windows:
notepad DockerfileCopy and paste this entire content:
FROM python:3.11-slim

WORKDIR /app

ENV PYTHONUNBUFFERED=1

COPY requirements.txt .

RUN pip install --no-cache-dir -r requirements.txt

COPY figma_server.py .

RUN useradd -m -u 1000 mcpuser && \
    chown -R mcpuser:mcpuser /app

USER mcpuser

CMD [”python”, “figma_server.py”]
Save the file:
macOS/Linux: Press Ctrl+O, then Enter to save, then Ctrl+X to exit
Windows: Click File > Save, then close Notepad
Step 2.4: Create requirements.txt
This file lists the Python libraries your server needs.
For macOS/Linux:
nano requirements.txtFor Windows:
notepad requirements.txt
```

**Copy and paste:**
```
mcp[cli]>=1.2.0
httpx
Save and close the file.
Step 2.5: Create figma_server.py
This is the heart of your server—the code that actually talks to Figma’s API.
For macOS/Linux:
nano figma_server.pyFor Windows:
notepad figma_server.pyCopy and paste the complete server code:
#!/usr/bin/env python3
import os
import sys
import logging
import re
import httpx
from mcp.server.fastmcp import FastMCP

logging.basicConfig(level=logging.INFO, stream=sys.stderr)
logger = logging.getLogger(”figma-server”)

mcp = FastMCP(”figma”)

FIGMA_API_TOKEN = os.environ.get(”FIGMA_API_TOKEN”, “”)
FIGMA_API_BASE = “https://api.figma.com/v1”

def extract_file_key_from_url(url: str) -> str:
    “”“Extract Figma file key from URL or return as-is if already a key”“”
    patterns = [
        r’figma\.com/(?:file|design)/([a-zA-Z0-9]+)’,
        r’figma\.com/board/([a-zA-Z0-9]+)’
    ]
    for pattern in patterns:
        match = re.search(pattern, url)
        if match:
            return match.group(1)
    return url.strip()

async def make_figma_request(endpoint: str, params: dict = None) -> dict:
    “”“Make authenticated request to Figma API”“”
    if not FIGMA_API_TOKEN:
        raise ValueError(”FIGMA_API_TOKEN environment variable not set”)

    headers = {”X-Figma-Token”: FIGMA_API_TOKEN}
    url = f”{FIGMA_API_BASE}{endpoint}”

    async with httpx.AsyncClient(timeout=30.0) as client:
        response = await client.get(url, headers=headers, params=params)
        response.raise_for_status()
        return response.json()

@mcp.tool()
async def get_file_info(file_url: str) -> str:
    “”“Get basic information about a Figma file”“”
    file_key = extract_file_key_from_url(file_url)
    data = await make_figma_request(f”/files/{file_key}”)

    pages = data.get(’document’, {}).get(’children’, [])
    page_names = [page.get(’name’, ‘Unnamed’) for page in pages]

    return f”“”File Info:
- Name: {data.get(’name’, ‘Unknown’)}
- Last Modified: {data.get(’lastModified’, ‘Unknown’)}
- Version: {data.get(’version’, ‘Unknown’)}
- Pages ({len(pages)}): {’, ‘.join(page_names)}”“”

@mcp.tool()
async def get_file_components(file_url: str) -> str:
    “”“Get all components from a Figma file”“”
    file_key = extract_file_key_from_url(file_url)
    data = await make_figma_request(f”/files/{file_key}/components”)

    components = data.get(’meta’, {}).get(’components’, {})

    if not components:
        return “No components found in this file”

    component_list = []
    for comp_id, comp_data in components.items():
        component_list.append(
            f”- {comp_data.get(’name’, ‘Unnamed’)} “
            f”(ID: {comp_id[:8]}...)”
        )

    return f”“”Found {len(components)} components:
{chr(10).join(component_list[:50])}
{’...(truncated)’ if len(component_list) > 50 else ‘’}”“”

@mcp.tool()
async def get_file_variables(file_url: str) -> str:
    “”“Get all design tokens (variables) from a Figma file”“”
    file_key = extract_file_key_from_url(file_url)
    data = await make_figma_request(f”/files/{file_key}/variables/local”)

    variables = data.get(’meta’, {}).get(’variables’, {})

    if not variables:
        return “No variables found in this file”

    # Group by type
    by_type = {}
    for var_id, var_data in variables.items():
        var_type = var_data.get(’resolvedType’, ‘UNKNOWN’)
        if var_type not in by_type:
            by_type[var_type] = []
        by_type[var_type].append(var_data.get(’name’, ‘Unnamed’))

    result = [f”Found {len(variables)} variables:\n”]
    for var_type, names in by_type.items():
        result.append(f”\n{var_type} ({len(names)}):”)
        result.append(’\n’.join(f”  - {name}” for name in names[:20]))
        if len(names) > 20:
            result.append(f”  ...(and {len(names) - 20} more)”)

    return ‘\n’.join(result)

@mcp.tool()
async def get_component_details(file_url: str, component_name: str) -> str:
    “”“Get detailed information about a specific component”“”
    file_key = extract_file_key_from_url(file_url)

    # First, get all components to find the matching one
    comp_data = await make_figma_request(f”/files/{file_key}/components”)
    components = comp_data.get(’meta’, {}).get(’components’, {})

    # Find component by name
    matching_comp = None
    for comp_id, comp_info in components.items():
        if component_name.lower() in comp_info.get(’name’, ‘’).lower():
            matching_comp = (comp_id, comp_info)
            break

    if not matching_comp:
        return f”Component ‘{component_name}’ not found”

    comp_id, comp_info = matching_comp

    # Get full file data to access component details
    file_data = await make_figma_request(f”/files/{file_key}”)

    return f”“”Component: {comp_info.get(’name’)}
ID: {comp_id}
Description: {comp_info.get(’description’, ‘No description’)}
Type: {comp_info.get(’type’, ‘COMPONENT’)}

Note: Use this ID to inspect the component in Figma Dev Mode for complete property details.”“”

if __name__ == “__main__”:
    mcp.run()
Save and close the file.
Step 2.6: Build the Docker Image
Now we’ll build your server into a Docker image. This packages everything up so it can run consistently.
Type this command:
docker build -t figma-mcp-server:latest .
```

**What this does:** Builds your custom server image. The `-t` flag names it `figma-mcp-server:latest` so Docker knows how to find it later.

**Wait for it to finish.** This takes 2-3 minutes the first time. You’ll see lots of output—that’s normal! At the end, you should see:
```
Successfully tagged figma-mcp-server:latest
If you see that, you’re golden. Move to the next step.
Step 3: Configure Docker MCP Toolkit Gateway
The Docker MCP Toolkit Gateway is what connects Claude Desktop to your custom server. Think of it as a bridge.
Step 3.1: Set Up Your Figma Token as a Secret
Docker secrets keep your Figma token secure. Replace your-figma-token-here with your actual token from Step 1:
docker mcp secret set FIGMA_API_TOKEN=”your-figma-token-here”Verify it was saved:
docker mcp secret lsYou should see FIGMA_API_TOKEN in the list.
Step 3.2: Create MCP Configuration Directory
mkdir -p ~/.docker/mcp/catalogsWhat this does: Creates the folder structure where Docker MCP Gateway looks for custom server configurations.
Step 3.3: Create Custom Catalog File
This file tells the gateway about your Figma server.
For macOS/Linux:
nano ~/.docker/mcp/catalogs/custom.yamlFor Windows:
notepad %USERPROFILE%\.docker\mcp\catalogs\custom.yamlCopy and paste:
version: 2
name: custom
displayName: Custom MCP Servers
registry:
  figma:
    description: “Extract design tokens, variables, styles, and components from Figma files”
    title: “Figma Design System API”
    type: server
    dateAdded: “2025-10-15T00:00:00Z”
    image: figma-mcp-server:latest
    tools:
      - name: get_file_info
      - name: get_file_variables
      - name: get_file_components
      - name: get_component_details
    secrets:
      - name: FIGMA_API_TOKEN
        env: FIGMA_API_TOKEN
        example: “figd_abc123...”
    metadata:
      category: integration
      tags:
        - design
        - figma
        - design-tokens
        - automation
Save and close.
Step 3.4: Update Registry File
For macOS/Linux:
nano ~/.docker/mcp/registry.yamlFor Windows:
notepad %USERPROFILE%\.docker\mcp\registry.yamlIf the file doesn’t exist yet, create it with this content:
version: 2
registry:
  figma:
    ref: “”
If it does exist, add the figma entry under registry:.
Save and close.
Step 4: Configure Claude Desktop
Almost there! Now we need to tell Claude Desktop about the MCP gateway.
You can achieve this by two ways, manually or with Docker Desktop app directly. I’ll show you both.
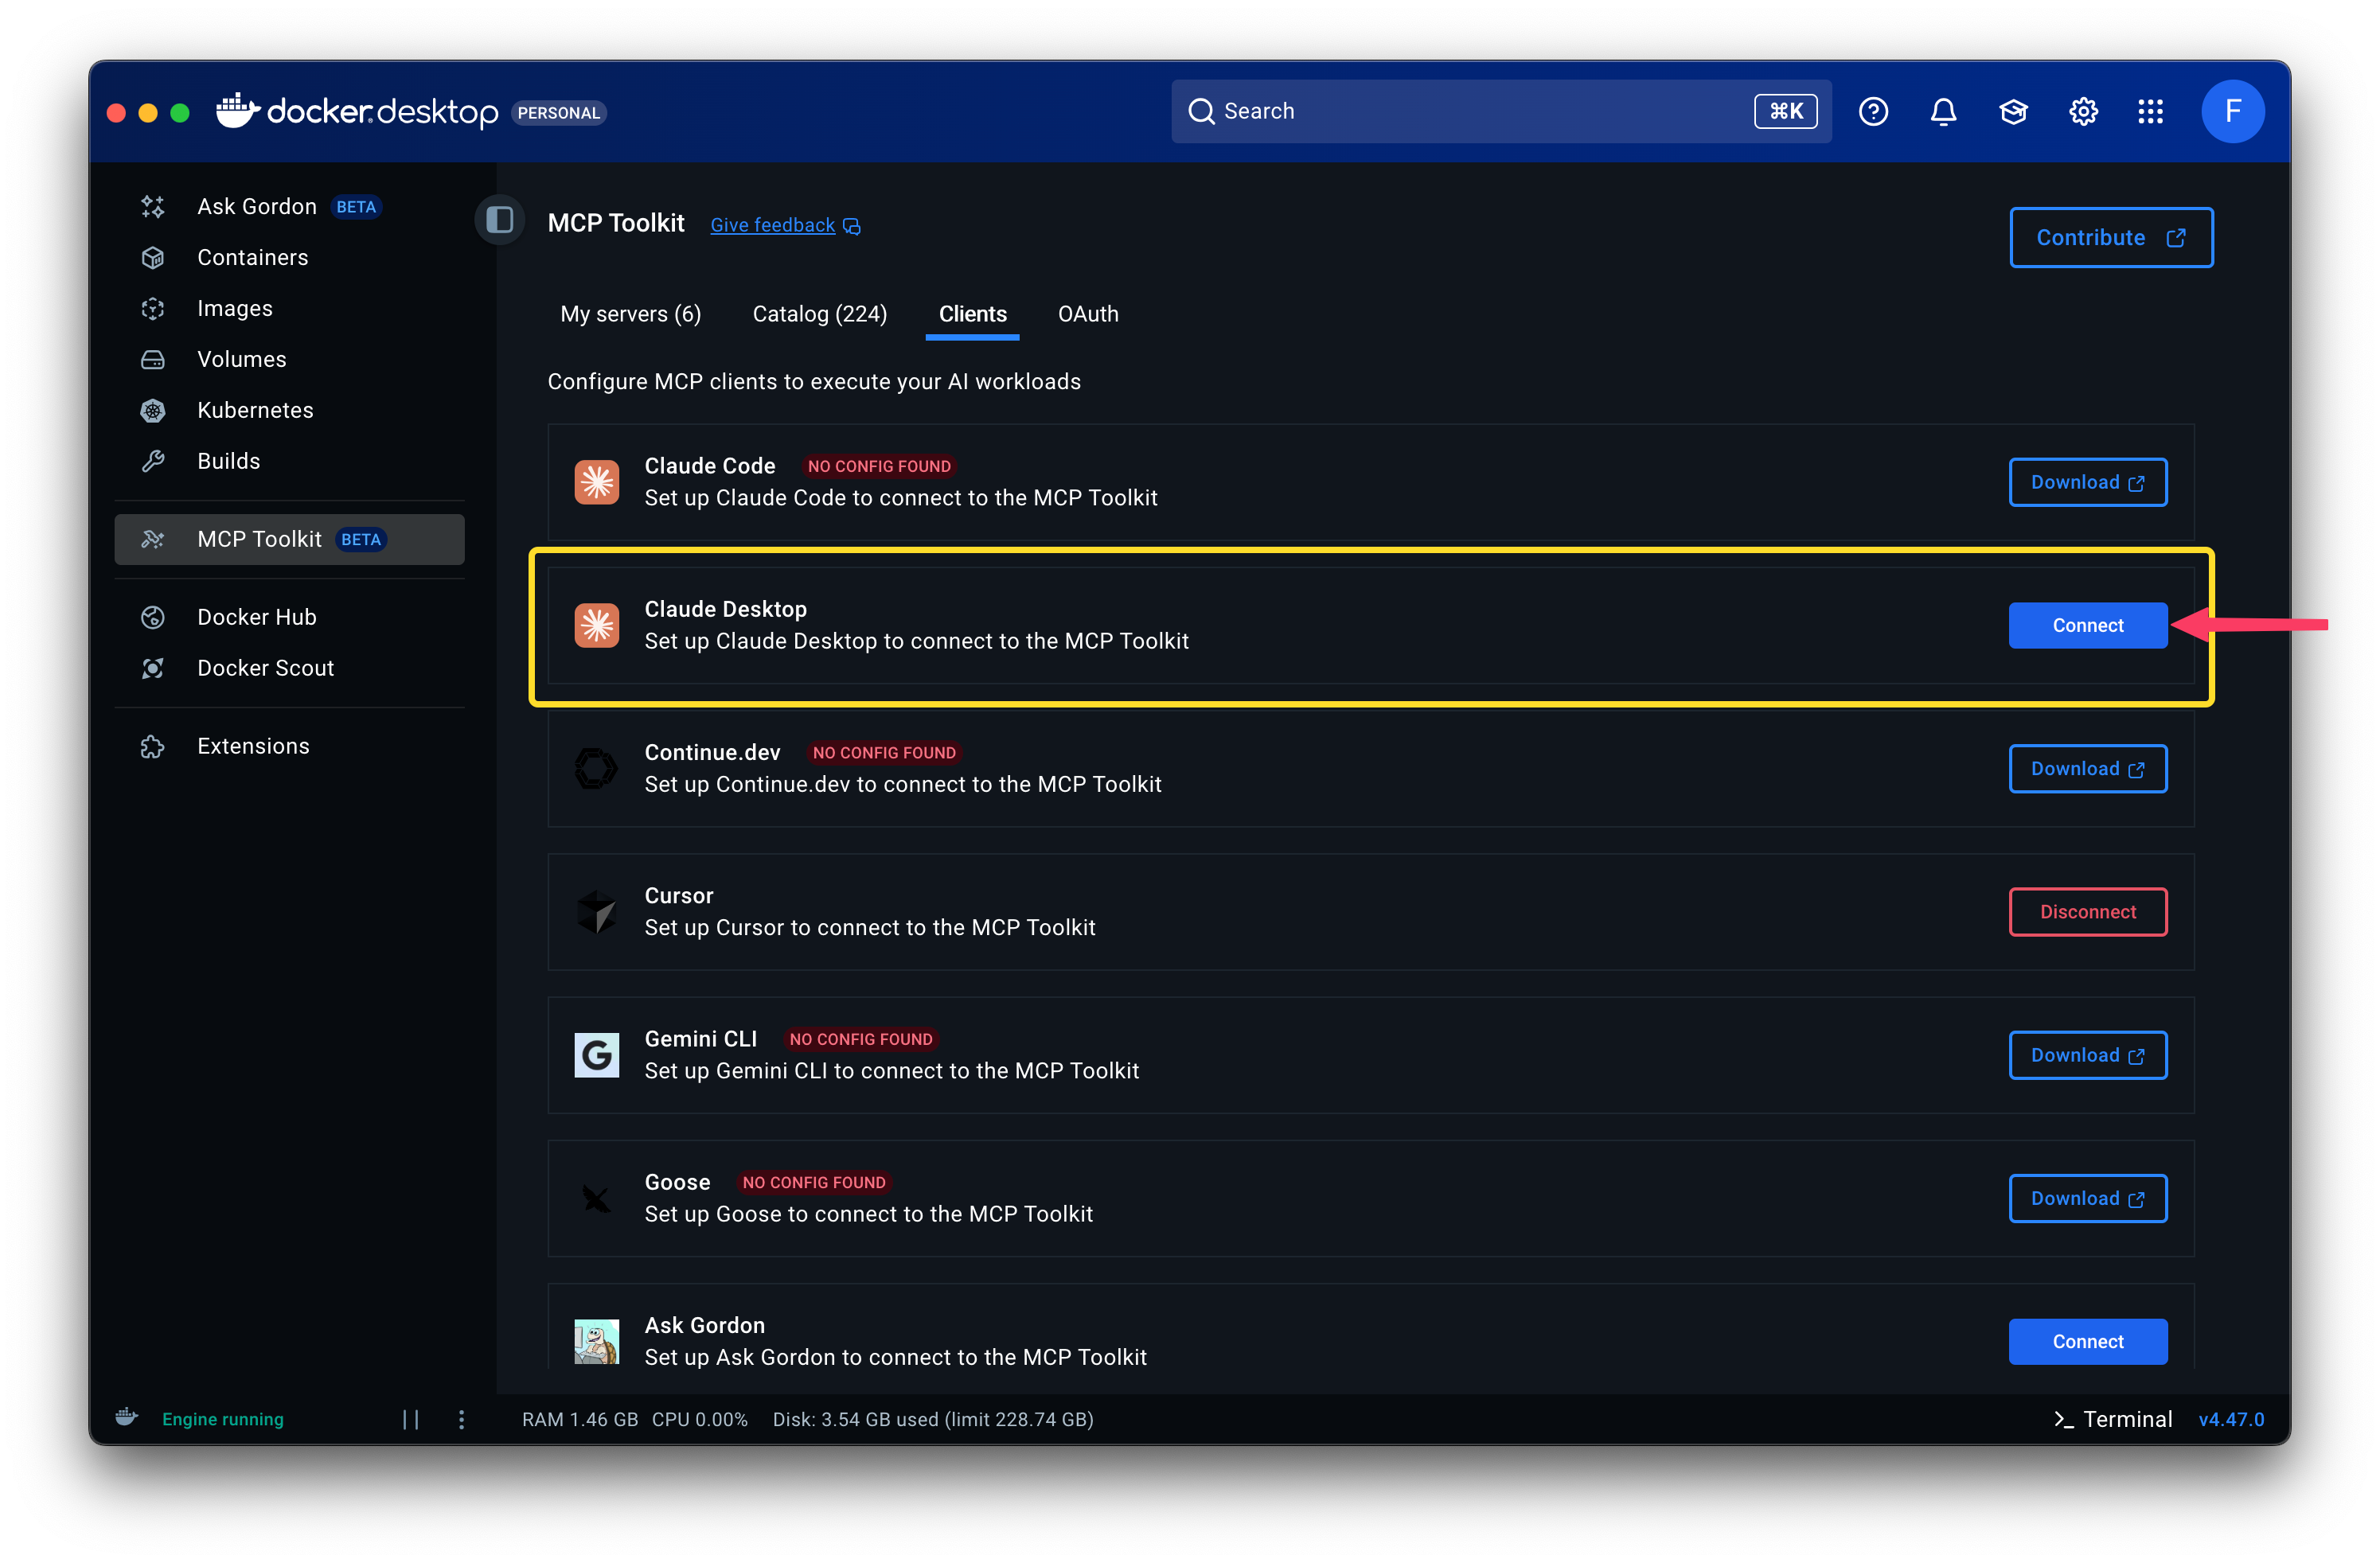
Using Docker Desktop
On your Docker client, navigate to
MCP Toolkitand locate theClientstabFind the Claude Desktop connector and click
ConnectRestart Claude Client
Manually:
Step 4.1: Find Your Claude Config File
Locations by OS:
macOS:
~/Library/Application Support/Claude/claude_desktop_config.jsonWindows:
%APPDATA%\Claude\claude_desktop_config.jsonLinux:
~/.config/Claude/claude_desktop_config.json
Step 4.2: Edit the Config
For macOS:
nano ~/Library/Application\ Support/Claude/claude_desktop_config.jsonFor Windows:
Press Windows Key + R
Type:
%APPDATA%\ClaudePress Enter
Right-click
claude_desktop_config.jsonOpen with Notepad
For Linux:
nano ~/.config/Claude/claude_desktop_config.jsonStep 4.3: Add Gateway Configuration
Replace the entire file content with this:
json
{
  “mcpServers”: {
    “mcp-toolkit-gateway”: {
      “command”: “docker”,
      “args”: [
        “run”,
        “-i”,
        “--rm”,
        “-v”, “/var/run/docker.sock:/var/run/docker.sock”,
        “-v”, “/Users/YOUR_USERNAME/.docker/mcp:/mcp”,
        “docker/mcp-gateway”,
        “--catalog=/mcp/catalogs/docker-mcp.yaml”,
        “--catalog=/mcp/catalogs/custom.yaml”,
        “--config=/mcp/config.yaml”,
        “--registry=/mcp/registry.yaml”,
        “--tools-config=/mcp/tools.yaml”,
        “--transport=stdio”
      ]
    }
  }
}
CRITICAL: Replace /Users/YOUR_USERNAME with your actual path:
macOS:
/Users/yourusername(replaceyourusernamewith your Mac username)Windows:
C:\\Users\\yourusername(use double backslashes!)Linux:
/home/yourusername
How to find your username:
macOS/Linux: Type
whoamiin terminalWindows: Type
echo %USERNAME%in command prompt
Save and close the file.
Step 5: Test Your Setup
Time to see if everything works!
Step 5.1: Restart Claude Desktop
Completely quit Claude Desktop:
macOS: Press Cmd+Q or Right-click icon → Quit
Windows: Right-click taskbar icon → Close window
Linux: Close all Claude windows
Wait 5 seconds (this is important—let everything shut down)
Open Claude Desktop again
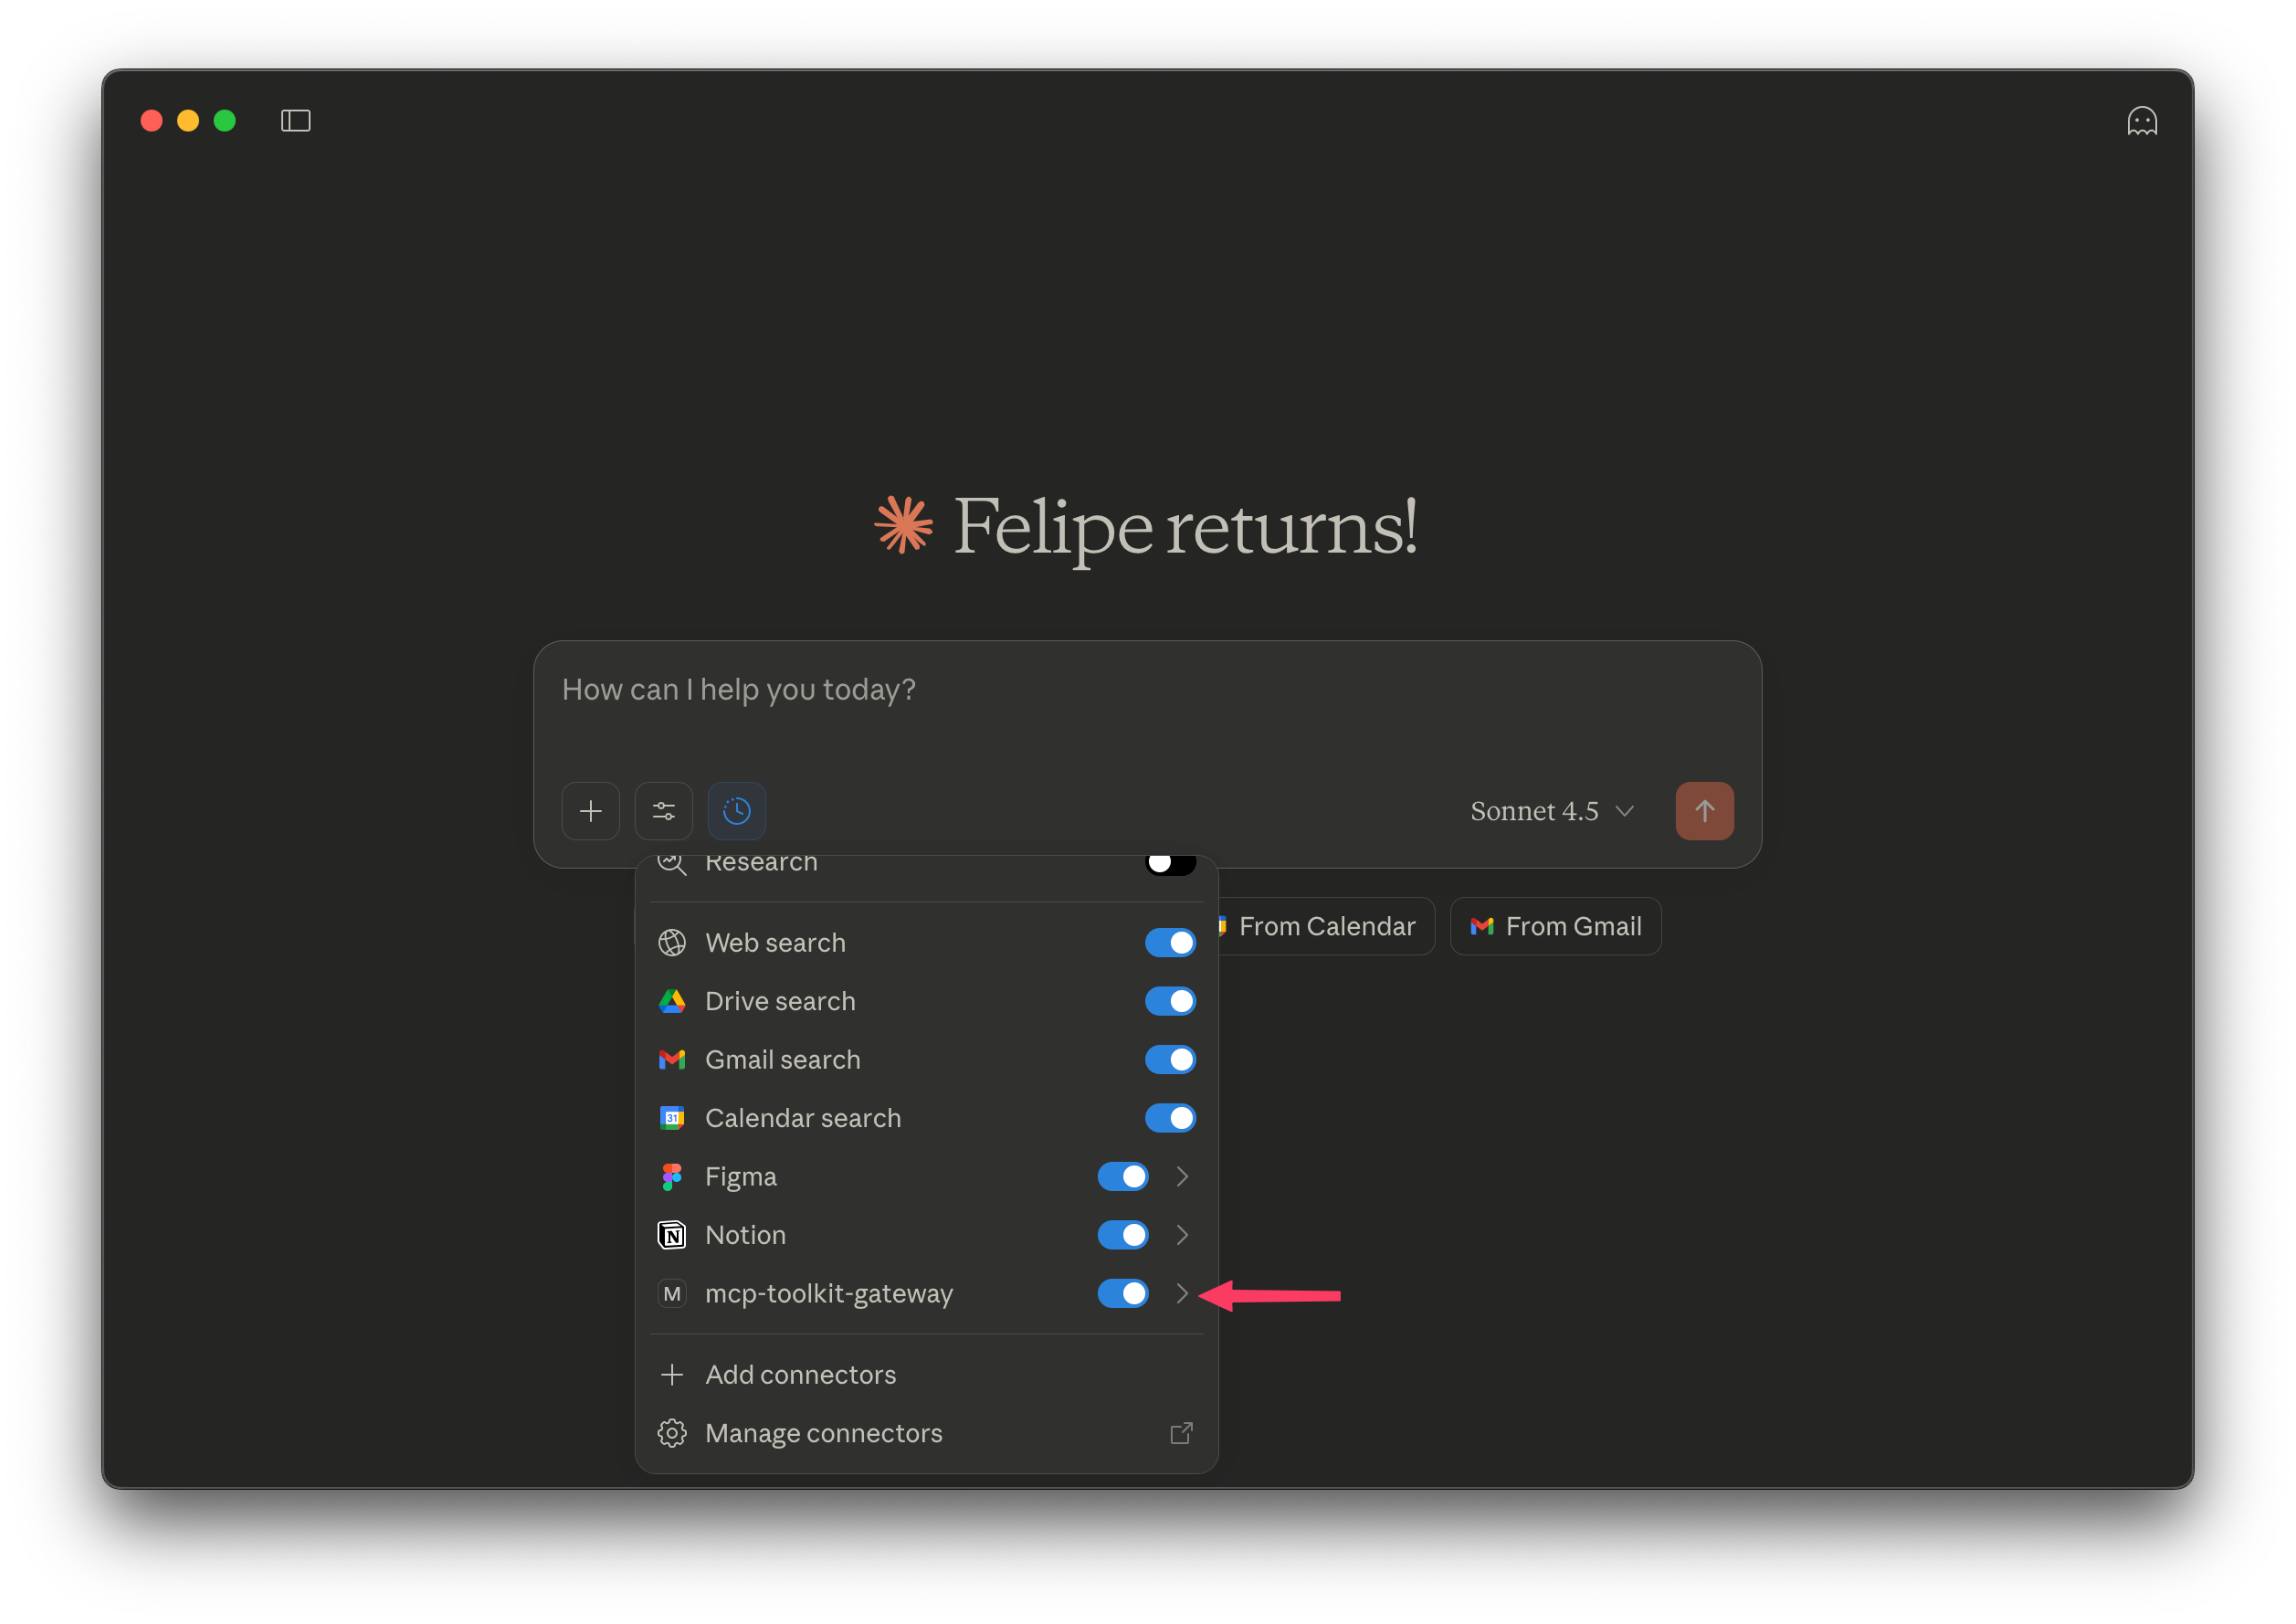
Step 5.2: Verify mcp-toolkit-gateway
In your Claude client:
Click on the chat settings icon and verify that
mcp-toolkit-gatewayis there.Activate it if disabled.
Step 5.3: Verify Tools Are Available In Claude
Type:
What Figma tools do you have available? Claude should respond with a list that includes:
get_file_infoget_file_variablesget_file_componentsget_component_details
If you see those, congratulations! Your setup works.
Step 5.4: Test with a Real File
Try this (use any Figma file URL you have access to):
Can you get information about this Figma file: https://www.figma.com/design/[YOUR_FILE_KEY]/[FILE_NAME] Claude should fetch the file info and show you:
File name
Last modified date
List of pages
If that works, you’re ready to start automating!
Real-World Workflows: What You Can Do Now
This is where it gets exciting. Let me show you practical workflows that will save you hours every week.
Workflow 1: Extract All Design Tokens
Problem: You need to document all color tokens with light and dark mode values for your developer handoff.
Old way (60 minutes):
Open Figma file
Click through variables panel
Manually copy each token name and value
Check light mode values
Switch to dark mode
Copy dark mode values
Format everything in a spreadsheet
Export to documentation
New way (2 minutes):
Ask Claude:
Get all variables from my design system file: [Figma URL]

Then create a table showing:
- Token name
- Type (color, spacing, etc.)
- Light mode value
- Dark mode value

Format it as markdown so I can paste it into our docs.
Claude will:
Fetch all variables via the MCP server
Organize them by type
Extract values for all modes
Generate a formatted table
Copy, paste, done. 30x faster.
This kind of token automation connects directly to designing accessible color tokens the right way—when you can extract and document tokens this quickly, there’s no excuse for skipping accessibility checks.
Workflow 2: Document a New Component
Problem: Designer just shipped a new “Toast” notification component with 8 variants. You need to document it for the team.
Old way (45 minutes):
Open component in Figma
Manually list all properties
Screenshot each variant
Note which design tokens are used
Write usage guidelines
Create code examples
Check accessibility requirements
New way (5 minutes):
Ask Claude:
Get details for the “Toast” component from: [Figma URL]

Create comprehensive documentation including:
- Component description
- All properties and options
- Which design tokens are used
- Accessibility requirements
- Usage examples

Follow our standard doc template.
Claude extracts everything automatically and generates complete documentation. 9x faster.
Workflow 3: Audit Design Token Usage
Problem: You need to find all components that use hardcoded values instead of design tokens.
Old way (2-3 days):
Manually open every component
Check layer properties
Note which ones lack token bindings
Create list of components to fix
Hope you didn’t miss anything
New way (15 minutes):
Ask Claude:
1. List all components from: [Figma URL]
2. For each component, check if it uses design tokens
3. Create a report showing:
   - Components using tokens (good)
   - Components with hardcoded values (needs fixing)
   - Suggested tokens to implement
Claude processes 50+ components automatically. 100x faster.
This is exactly the kind of systematic approach that helps you stay on top of building comprehensive UX documentation with AI—when you can audit at this scale, quality becomes scalable.
Workflow 4: Compare Design Systems Across Files
Problem: You maintain design systems for multiple brands and need to check consistency.
Old way (2 hours):
Open Brand A file
List all color tokens
Open Brand B file
List all color tokens
Manually compare in spreadsheet
Note differences
New way (10 minutes):
Ask Claude:
Compare design tokens between:
- Brand A file: [URL 1]
- Brand B file: [URL 2]

Show me:
- Tokens that exist in both
- Tokens unique to each brand
- Different values for same token names
Claude fetches both, compares, and reports. 12x faster.
Troubleshooting Common Issues
Issue: Docker commands not found
Error message: command not found: docker
Solution: Docker Desktop isn’t running. Open Docker Desktop first, wait for it to fully start (you’ll see a green icon), then try again.
Issue: Permission denied
Error message: Permission denied
Solution:
macOS/Linux: Add
sudobefore docker commands:sudo docker build ...Windows: Run Command Prompt as Administrator (right-click → Run as administrator)
Issue: Can’t see Figma tools in Claude
Symptoms: Claude says it doesn’t have Figma tools available
Solution:
Verify Docker Desktop is running (green icon in system tray)
Check secrets:
docker mcp secret list(should show FIGMA_API_TOKEN)Check image exists:
docker images | grep figma(should show your server)Completely quit Claude Desktop (don’t just close windows—actually quit the app)
Wait 10 seconds
Open Claude Desktop again
Check Claude Desktop logs for errors (Help → Show Logs)
Issue: “FIGMA_API_TOKEN not set” error
Error message: FIGMA_API_TOKEN environment variable not set
Solution:
Run the secret command again:
docker mcp secret set FIGMA_API_TOKEN=”your-token”Make sure you’re not including extra spaces or quotes
Verify with:
docker mcp secret ls
Issue: Claude shows “Connection failed”
Symptoms: Claude tries to use tools but connection fails
Solution:
Verify Docker is running
Check the path in
claude_desktop_config.jsonmatches your actual home directoryMake sure all YAML files are properly formatted (no extra spaces, correct indentation)
Try running this to verify gateway works:
docker run --rm docker/mcp-gateway --version
Issue: File not found or access denied
Error message: “File not found” or “Permission denied” when accessing Figma file
Solution:
Make sure your Figma token has access to that file
Check that the file URL is correct
If it’s a team file, verify your token’s account is a member
Try accessing the file in your browser first to confirm you have access
What We’ve Accomplished

Let’s zoom out for a second and appreciate what you just built.
You now have:
A custom Figma MCP server that talks directly to Figma’s API
Secure token management via Docker secrets
Claude Desktop integration for natural language automation
The foundation for 6-100x faster design system documentation
You can now:
Extract design tokens in seconds instead of minutes
Document components automatically with complete accuracy
Audit your entire design system for consistency instantly
Keep documentation always in sync with Figma
The compound effect:
Here’s what really excites me about this setup—it’s not just about saving time on individual tasks. It’s about removing friction from your entire design system workflow.
When documentation is this easy, you actually keep it current. When token extraction is instant, you stop cutting corners. When auditing takes minutes instead of days, you catch inconsistencies before they become technical debt.
Over time, this compounds. Your design system stays healthier. Your team moves faster. The gap between design and implementation shrinks.
And that’s exactly what makes this approach aligned with inclusive design principles—when automation handles the mechanical parts, you have more cognitive space to think about accessibility, user needs, and inclusive patterns.
Next Steps and Ideas
If you want to go deeper:
Add custom tools to your Figma server for your specific workflows
Integrate with other tools - Claude can use multiple MCP servers together (Notion, Slack, etc.)
Build documentation pipelines - automatically regenerate docs on Figma changes
Create design system dashboards - fetch metrics and visualize system health
Resources for learning more:
MCP Protocol Documentation - Official protocol reference
Figma API Reference - Complete Figma API docs
Design Systems Automation Guide - Broader automation context
The Bigger Picture
If you’re still reading, you probably care deeply about design systems. You know that great systems require constant maintenance. You’ve felt the pain of documentation drift.
This setup won’t solve every design system challenge. But it removes one of the biggest bottlenecks: keeping documentation accurate and current.
In my experience, the teams with the healthiest design systems aren’t the ones with the fanciest tools. They’re the teams that made documentation easy enough that it actually happens.
Automation isn’t about replacing judgment or craft. It’s about amplifying your capacity to maintain quality at scale.
What will you build with that extra time?